开发案例
- 1. 奔跑的熊
- 2. 旋转木马
- 3. 背景换肤
- 4. tab栏切换
- 5. 下拉菜单
- 6. 发布留言
- 1)原生JS实现
- 2)vue 实现
- 7. 动态生成表格
- 8. 图片跟随鼠标移动
- 9. 定时器实现
- 10. 获取URL参数数据
- 11. 拖动模态框(登陆界面)
- 12. 放大镜效果
- 13. 仿淘宝固定侧边栏
- 14. 轮播图
- 15. 导航栏背景图移动
- 16. 记住用户名
- 17. 手风琴效果
- 18. 可视化示例图
1. 奔跑的熊

<!DOCTYPE html>
<html lang="Cn_zh">
<head>
<meta charset="UTF-8">
<meta http-equiv="X-UA-Compatible" content="IE=edge">
<meta name="viewport" content="width=divdiv, initial-scale=1.0">
<title>Document</title>
<style>
.ss {
width: 100%;
height: 450px;
background-image: url(/Picture/静态合集/山峰.jpg);
}
.ss .ss1 {
position: absolute;
width: 185px;
height: 100px;
top: 64%;
background: url(/Picture/静态合集/熊.png) no-repeat;
animation: xiong 1s steps(8) infinite, zhongxin 3s forwards;
}
@keyframes xiong {
0% {
background-position: 0 0;
}
100% {
background-position: -1500px 0;
}
}
@keyframes zhongxin {
0% {
left:0;
}
100% {
left:45%;
transform: translateX(-50%);
}
}
</style>
</head>
<body>
<div class="ss">
<div class="ss1"></div>
</div>
</body>
</html>
2. 旋转木马

<!DOCTYPE html>
<html lang="Cn_zh">
<head>
<meta charset="UTF-8">
<meta http-equiv="X-UA-Compatible" content="IE=edge">
<meta name="viewport" content="width=device-width, initial-scale=1.0">
<title>Document</title>
<style>
body {
perspective: 1000px;
background-color: pink;
}
section {
position: relative;
transform-style: preserve-3d;
width: 300px;
height: 200px;
margin: 300px auto;
animation: xzmm 10s linear infinite;
}
section:hover {
animation-play-state: paused;
}
@keyframes xzmm {
0% {
transform: rotateY(0);
}
100% {
transform: rotateY(360deg);
}
}
section div {
position: absolute;
top: 0;
left: 0;
width: 100%;
height: 100%;
background: url(/Picture/动图合集/雨滴.gif) no-repeat;
}
section div:nth-child(1) {
transform: translateZ(300px);
}
section div:nth-child(2) {
transform: rotateY(60deg) translateZ(300px);
}
section div:nth-child(3) {
transform: rotateY(120deg) translateZ(300px);
}
section div:nth-child(4) {
transform: rotateY(180deg) translateZ(300px);
}
section div:nth-child(5) {
transform: rotateY(240deg) translateZ(300px);
}
section div:nth-child(6) {
transform: rotateY(300deg) translateZ(300px);
}
</style>
</head>
<body>
<section>
<div></div>
<div></div>
<div></div>
<div></div>
<div></div>
<div></div>
<div></div>
</section>
</body>
</html>
3. 背景换肤

点击图片,更换背景
<!DOCTYPE html>
<html lang="Cn_zh">
<head>
<meta charset="UTF-8">
<meta http-equiv="X-UA-Compatible" content="IE=edge">
<meta name="viewport" content="width=device-width, initial-scale=1.0">

<title>Document</title>
</head>
<body>
<style>
img {
position: relative;
width: 100px;
height: 100px;
margin: auto;
left: 20%;
margin-top: 50px;
}
</style>
<img src="/Picture/静态合集/大背景.gif" alt="">
<img src="/Picture/静态合集/黑背景.gif" alt="">
<img src="/Picture/动图合集/雨滴.gif" alt="">
<img src="/Picture/动图合集/1.gif" alt="">
<script>
// 1. 获取元素
var imgs = document.getElementsByTagName('img');
var body = document.body;
// 2. 循环注册事件
for(var i = 0; i < imgs.length; i++) {
imgs[i].onclick = function() {
// 1) 先把所有的背景去掉  干掉所有人
for(var i = 0; i < imgs.length; i++) {
body.style.backgroundImage = '';
}
// 2) 然后让当前点击元素的url为body的url  留下我自己
body.style.background = 'url('+this.src+')';
}
}
</script>
</body>
</html>
4. tab栏切换

跟着tab栏切换,内容也跟着变
<!DOCTYPE html>
<html lang="en">
<head>
<meta charset="UTF-8">
<meta http-equiv="X-UA-Compatible" content="IE=edge">
<meta name="viewport" content="width=device-width, initial-scale=1.0">
<title>tab栏切换</title>
<style>
* {
margin: 0;
padding: 0;
}
.tab {
padding: 10px 20px;
}
.tab .tab_list {
background-color: #eef1ee;
height: 39px;
border: 1.5px solid #d8dad8;
}
.tab_list li {
float: left;
line-height: 38px;
padding: 0 20px;
list-style: none;
text-align: center;
cursor: pointer;
}
.tab_list .current {
position: relative;
top: -1px;
background-color: #c81623;
color: #fff;
border: 1.5px solid #b95c53;
}
.tab_con .item {
display: none;
}
</style>
</head>
<body>
<div class="tab">
<div class="tab_list">
<ul>
<li class="current">商品介绍</li>
<li>规格与包装</li>
<li>销后保障</li>
<li>商品评价</li>
<li>手机社区</li>
</ul>
</div>
<div class="tab_con">
<div class="item" style="display: block;">
商品介绍模块内容
</div>
<div class="item" >
规格与包装模块内容
</div>
<div class="item">
销后保障模块内容
</div>
<div class="item">
商品评价模块内容
</div>
<div class="item">
手机社区模块内容
</div>
</div>
</div>
<script>
var lis = document.getElementsByTagName('li');
var item = document.getElementsByClassName('item');
console.log(lis);
for(var i = 0; i < lis.length; i++) {
lis[i].setAttribute('index', i);
lis[i].onclick = function() {
for(var i = 0; i < lis.length; i++ ) {
lis[i].className = '';
item[i].style = 'display: none;';
}
this.className = 'current';
var index = this.getAttribute('index');
item[index].style = 'display: block;';
}
}
</script>
</body>
</html>
5. 下拉菜单

鼠标经过,显示下拉菜单
<!DOCTYPE html>
<html lang="en">
<head>
<meta charset="UTF-8">
<meta http-equiv="X-UA-Compatible" content="IE=edge">
<meta name="viewport" content="width=device-width, initial-scale=1.0">
<title>下拉菜单</title>
<style>
li { list-style: none; }
a {text-decoration: none;}
.nav>li {
float: left;
margin: 0 10px;
}
.nav li a {
/* background-color: pink; */
padding-left: 10px;
}
.nav>li>a:hover {
background-color: #eee;
}
.nav ul {
display: none;
position: absolute;
padding: 0px;
margin: 0;
/* width: 100%; */
border-left: 1px solid #FECC5B;
border-right: 1px solid #FECC5B;
}
.nav ul li {
border-bottom: 1px solid #FECC5B;
}
.nav ul li a {
padding: 0 10px;
}
.nav ul li a:hover {
background-color: #FFF5DA;
}
</style>
</head>
<body>
<ul class="nav">
<li>

<a href="#">微博<span id="l">∨</span></a>
<ul>
<li><a href="">私信</a></li>
<li><a href="">评论</a></li>
<li><a href="">@我</a></li>
</ul>
</li>
<li>
<a href="#">微信<span id="l">∨</span></a>
<ul>
<li><a href="">私信</a></li>
<li><a href="">评论</a></li>
<li><a href="">@我</a></li>
</ul>
</li>
<li>
<a href="#"> QQ <span id="l">∨</span></a>
<ul>
<li><a href="">私信</a></li>
<li><a href="">评论</a></li>
<li><a href="">@我</a></li>
</ul>
</li>
</ul>
<script>
// 1. 获取元素
var nav = document.querySelector('.nav');
var span = document.querySelectorAll('#l');
var lis = nav.children;
console.log(span);
// 2. 循环注册事件
for(var i = 0; i < lis.length; i++) {
lis[i].onmouseover = function() {
this.children[1].style.display = 'block';
}
lis[i].onmouseout = function() {
this.children[1].style.display = 'none';
}
}
</script>
</body>
</html>
6. 发布留言
1)原生JS实现
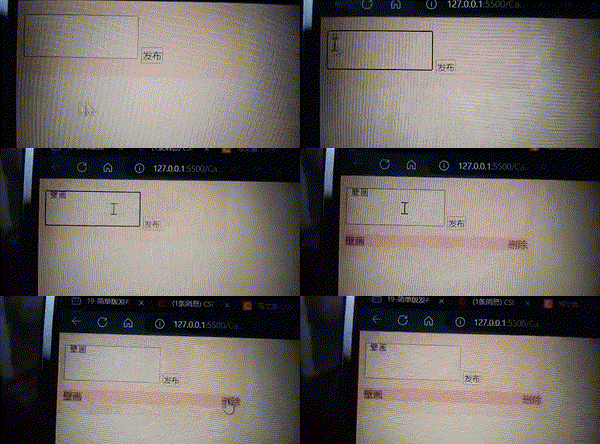
进行留言,删除等操作
<body>
<div class="box">
<textarea rows="4" id="wenbenyu">
</textarea>
<input type="button" value="发布" name="" id="anniu">
<ul ></ul>
</div>
<script>
var textarea = document.getElementById('wenbenyu');
var input = document.getElementById('anniu');
var ul = document.querySelector('ul'); // 获取父节点
input.onclick = function() {
if(textarea.value == '') {
alert('你没有输入内容');
return false;
} else {
// 1. 创建节点元素节点
var li = document.createElement('li');
li.innerHTML = textarea.value + '删除';
// 添加元素
ul.insertBefore(li, ul.children[0]);
// 删除元素
var as = document.querySelectorAll('a');
for(var i = 0; i < as.length; i++) {
as[i].onclick = function() {
ul.removeChild(this.parentNode);
}
}
}
}
</script>
</body>
2)vue 实现

<body>
<div id="app">
<h2>在线便签</h2>
<input v-model="massage" placeholder="请输入任务" type="text" @keyup.enter="add(massage)">
<ul>
<!-- 你好 -->
<li v-for="(item, index) in arr">
<span>{{index +1+'.'}}</span> {{item }}
<button @click="remove">X</button>
</li>
<li v-show="arr.length > 0" class="dibu">
{{ arr.length+ ' 组数据'}}
<button @click="del" style="color: #fff; margin-top: 3px;"> clear </button>
</li>
</ul>
</div>
</body>
<script src="http://cdn.jsdelivr.net/npm/vue/dist/vue.js"></script>
<script>
var app = new Vue({
el: "#app",
data: {
arr: [],
massage: '',
content: 222
},
methods: {
// 添加
add: function (p1) {
this.arr.push(p1);
this.massage = ''
},
// 移除
remove: function () {
this.arr.shift();
},
// 全删
del: function () {
this.arr = []
},
// 鼠标经过
delX: function (p1) {
massage = p1
}
}
})
</script>
7. 动态生成表格

动态生成表格,可以对其进行删除
<!DOCTYPE html>
<html lang="Cn_zh">
<head>
<meta charset="UTF-8">
<meta http-equiv="X-UA-Compatible" content="IE=edge">
<meta name="viewport" content="width=device-width, initial-scale=1.0">
<title>动态表格</title>
<style>
table {
width: 500px;
margin: 100px auto;
border-collapse: collapse;
text-align: center;
}
td, th {
border: 1px solid #333;
}
thead tr {
height: 40px;
background-color: #ccc;
}
</style>
</head>
<body>
<table cellspacing="0">
<thead>
<tr style="background-color: #cacdca;">
<th>姓名</th>
<th>科目</th>
<th>成绩</th>
<th>操作</th>
</tr>
</thead>
<tbody></tbody>
</table>
<script>
// 1. 准备数据
var dates = [
{
name: '买买提',
subject: 'Javascript',
score: 100
}, {
name: '古丽',
subject: 'Javascript',
score: 100
}, {
name: '艾莉',
subject: 'Javascript',
score: 100
}, {
name: '卖力',
subject: 'Javascript',
score: 100
},
];
// 2. tbody创建行
var tbody = document.querySelector('tbody');
for(var i = 0; i < dates.length; i++) {
// 1) 创建 tr
var tr = document.createElement('tr');
tbody.appendChild(tr);
// 2) 行里面创建单元格
for (var k in dates[i]) {
// 创建单元格
var td = document.createElement('td');
// 把对象里面的属性值 dates[i][k] 给td
td.innerHTML = dates[i][k];
tr.appendChild(td);
}
// 3) 操作单元格创建
var td = document.createElement('td');
td.innerHTML = '删除';
tr.appendChild(td);
}
// 3. 删除操作设置
var a = document.querySelectorAll('a');
for(var i = 0; i < a.length; i++) {
a[i].onclick = function() {
tbody.removeChild(this.parentNode.parentNode);
}
}
</script>
</body>
</html>
8. 图片跟随鼠标移动

图片随着鼠标一起移动
<!DOCTYPE html>
<html lang="Cn_zh">
<head>
<meta charset="UTF-8">
<meta http-equiv="X-UA-Compatible" content="IE=edge">
<meta name="viewport" content="width=device-width, initial-scale=1.0">
<title>图片跟随鼠标移动</title>
<style>
img {
position: absolute;
}
</style>
</head>
<body>
<img src="/Picture/桌面GIF图标/播放图标.png" alt="">
<script>
var img = document.querySelector('img');
document.addEventListener('mousemove', function(e) {
console.log(e.clientX);
console.log(e.clientY);
img.style.left = e.pageX - 15 + 'px';
img.style.top = e.pageY - 15 + 'px ';
});
</script>
</body>
</html>
9. 定时器实现

实现计时功能
<!DOCTYPE html>
<html lang="Cn_zh">
<head>
<meta charset="UTF-8">
<meta http-equiv="X-UA-Compatible" content="IE=edge">
<meta name="viewport" content="width=device-width, initial-scale=1.0">
<title>定时器</title>
<style>
span{
float: left;
width: 20px;
height: 20px;
background-color: #000;
color: #fff;
padding-left: 10px;
padding-right: 10px;
margin: 2px;
}
</style>
</head>
<body>
<span class="hour">1</span>
<span class="minute">1</span>
<span class="second">1</span>
<script>
// 获取元素
var hour = document.querySelector('.hour'); // 小时
var minute = document.querySelector('.minute'); // 分钟
var second = document.querySelector('.second'); // 秒
var inputTime = +new Date('2022-12-26 14:41:00'); // 返回的是用户输入时间总的毫秒数
conutDown(); // 先调用一次
// 开启定时器
var timer = setInterval(conutDown, 1000);
function conutDown() {
var nowTIme = +new Date(); // 返回的时当前时间总的毫秒数
var times = (inputTime - nowTIme) / 1000; // time 是剩余时间总的毫秒数
if(times <= 0) {
window.clearInterval(timer);
}
var h = parseInt(times / 60 / 60 % 24); // 时
h = h < 10 ? '0' + h : h;
hour.innerHTML = h;
var m = parseInt(times / 60 % 60); // 分
m = m < 10 ? '0' + m : m;
minute.innerHTML = m;
var s = parseInt(times % 60); // 当前的秒
s = s < 10 ? '0' + s : s;
second.innerHTML = s;
}
</script>
</body>
</html>
10. 获取URL参数数据

// login.html
<!DOCTYPE html>
<html lang="en">
<head>
<meta charset="UTF-8">
<meta http-equiv="X-UA-Compatible" content="IE=edge">
<meta name="viewport" content="width=device-width, initial-scale=1.0">
<title>登陆页面</title>
</head>
<body>
<form action="index.html">
<div>登陆页面</div>
用户名:<input type="text" name="uname"  id="">
<input type="submit" name="" value="登录">
</form>
</html>
// index.html
<!DOCTYPE html>
<html lang="Cn_zh">
<head>
<meta charset="UTF-8">
<meta http-equiv="X-UA-Compatible" content="IE=edge">
<meta name="viewport" content="width=device-width, initial-scale=1.0">
<title>首页</title>
<style>
</style>
</head>
<body>
<div>首页</div>
<div class="s" style="margin: 100px;">欢迎光临</div>
<script>
var div = document.querySelector('.s');
var ss = location.search; // ?uname=12
// 1. 先去掉? substr('起始位置',截取几个字符)
var params = ss.substr(1); //uname=12
// 2. 利用 = 把字符串分割为数组 split('=');
var arr = params.split('='); // ['uname', '12']
// 3. 把数据写入div中
div.innerHTML = arr[1] + ' 欢迎光临';
</script>
</body>
</html>
11. 拖动模态框(登陆界面)

<!DOCTYPE html>
<html lang="Cn_zh">
<head>
<meta charset="UTF-8">
<meta http-equiv="X-UA-Compatible" content="IE=edge">
<meta name="viewport" content="width=device-width, initial-scale=1.0">
<title>拖动模态框</title>
<style>
.login-header {
margin-left: 40%;
}
.login {
display: none;
width: 512px;
height: 280px;
position: fixed;
border: #ebebeb solid 1px;
left: 50%;
top: 50%;
background: #fff;
box-shadow: 0px 0px 20px #ddd;
z-index: 9999;
transform: translate(-50%, -50%);
}
.login-title {
width: 100%;
text-align: center;
line-height: 40px;
height: 40px;
font-size: 18px;
position: relative;
cursor: move;
background: #ebebeb;
border-bottom: #ebebeb 1px solid;
}
.login-input-content {
margin-top: 20px;
}
.login-button {
width: 50%;
margin: 30px auto 0px auto;
line-height: 40px;
font-size: 14px;
border: #ebebeb 1px solid;
text-align: center;
}
.login-bg {
display: none;
width: 100%;
height: 100%;
position: fixed;
top: 0;
right: 0;
background: rgba(0, 0, 0, .3);
}
a {
text-decoration: none;
color: #000;
}
.login-button a {
display: block;
}
.login-input input.list-input {
float: left;
line-height: 35px;
height: 35px;
width: 350px;
border: #ebebeb 1px solid;
text-indent: 5px;
}
.login-input {
overflow: hidden;
margin: 0px 0px 20px 0px;
}
.login-input label {
float: left;
width: 90px;
padding-right: 10px;
text-align: right;
line-height: 35px;
height: 35px;
font-size: 14px;
}
.login-title span {
position: absolute;
font-size: 12px;
right: -20px;
top: -23px;
background: #ebebeb;
border: #d8d8d8 solid 1px;
width: 40px;
height: 40px;
border-radius: 20px;
}
</style>
</head>
<body>
<div class="login-header"><a id="link" href="javascrip:;">点击,弹出登录框</a></div>
<div id="login" class="login">
<div id="title" class="login-title">登陆会员
<span><a href="javascript:void(0);" class="close-login" id="closeBtn">关闭</a></span>
</div>
<div class="login-input-content">
<div class="login-input">
<label for="">用    户    名:</label>
<input type="text" placeholder="请输入用户名" name="info[username]" id="username" class="list-input">
</div>
<div class="login-input">
<label for="">登陆密码:</label>
<input type="password" placeholder="请输入登陆密码" name="info[password]" id="password" class="list-input">
</div>
</div>
<div id="loginBtn" class="login-button"><a href="javascript:vodi(0);" id="login-button-submit">登陆会员</a></div>
</div>
<!-- 遮罩层 -->
<div id="bg" class="login-bg"></div>
<script>
var login = document.querySelector('.login');
var bg = document.querySelector('.login-bg');
var header = document.querySelector('.login-header');
var close = document.querySelector('.close-login');
var title = document.querySelector('#title');
// 显示登录窗口
header.addEventListener('click', function() {
login.style.display = 'block';
bg.style.display = 'block';
});
// 隐藏登录窗口
close.addEventListener('click', function() {
login.style.display = 'none';
bg.style.display = 'none';
});
// 窗口拖拽
title.addEventListener('mousedown', function(e) {
var x = e.pageX - login.offsetLeft;
var y = e.pageY - login.offsetTop;
document.addEventListener('mousemove', move);
function move(e) {
login.style.left = e.pageX - x + 'px';
login.style.top = e.pageY - y + 'px';
}
document.addEventListener('mouseup', function(e) {
document.removeEventListener('mousemove', move);
});
});
</script>
</body>
</html>
12. 放大镜效果

<!DOCTYPE html>
<html lang="Cn_zh">
<head>
<meta charset="UTF-8">
<meta http-equiv="X-UA-Compatible" content="IE=edge">
<meta name="viewport" content="width=device-width, initial-scale=1.0">
<title>放大镜效果</title>
<style>
.imgs {
position: relative;
width: 200px;
height: 310px;
border: #dbdbdb 1px ridge;
}
.imgl {
width: 100%;
height: 100%;
}
.imgs .ss {
width: 70%;
padding-left: 30px;
}
.imgs .zhezhao {
display: none;
position: absolute;
top: 0;
left: 0;
width: 100px;
height: 100px;
background: rgb(255, 255, 3, .5);
cursor: move;
}
.imgs .big {
display: none;
position: absolute;
left: 210px;
top: 0px;
width: 310px;
height: 310px;
border: 1px solid #ccc;
overflow: hidden;
}
.imgs .ds {
position: absolute;
top: 0;
left: 0;
padding: 0 80px;
width: 130%;
}
</style>
</head>
<body>
<div class="imgs">
<div class="imgl">
<img src="/Picture/静态合集/手机.png" class="ss" alt="">
<div class="zhezhao"></div>
</div>
<div class="big">
<img class="ds" src="/Picture/静态合集/手机.png" alt="">
</div>
</div>
<script>
var img = document.querySelector('.imgl');
var zhezhao = document.querySelector('.zhezhao');
var big = document.querySelector('.big');
var ds = document.querySelector('.ds');
// 鼠标进入图片框内时,显示遮罩层和放大层
img.addEventListener('mouseover', function() {
zhezhao.style.display = 'block';
big.style.display = 'block';
});
// 鼠标离开图片框区域时,隐藏遮罩层和放大层
img.addEventListener('mouseout', function() {
zhezhao.style.display = 'none';
big.style.display = 'none';
});
// 遮罩层和放大层跟着鼠标移动
img.addEventListener('mousemove', function(e) {
// 鼠标移动距离
var x = e.pageX - this.offsetLeft -57;
var y = e.pageY - this.offsetTop - 57;
if(x <= 0) {
x = 0;
} else if(x >= 100) {
x = 100;
}
if(y <= 0) {
y = 0;
} else if(y >= 210) {
y = 210;
}
zhezhao.style.left = x + 'px';
zhezhao.style.top = y + 'px';
// 放大区最大移动距离
var bigMax = ds.offsetWidth - big.offsetWidth;
// 移动距离 x y
var xx = x * bigMax / 100;
var yy = y * bigMax / 90;
ds.style.left = -xx + 'px';
ds.style.top = -yy + 'px';
});
</script>
</body>
</html>
13. 仿淘宝固定侧边栏

<!DOCTYPE html>
<html lang="Cn_zh">
<head>
<meta charset="UTF-8">
<meta http-equiv="X-UA-Compatible" content="IE=edge">
<meta name="viewport" content="width=device-width, initial-scale=1.0">
<title>首页</title>
<style>
* {
margin: 0;
padding: 0;
}
.w {
width:600px;
margin: auto;
margin-bottom: 10px;
}
.header {
height: 100px;
background-color: #881382;
}
.banner {
height: 200px;
background-color: #7ec9ec;
}
.main {
height: 700px;
background-color: #96bf2a;
}
.bar {
position: absolute;
left: 50%;
top: 45.5%;
margin-left: 300px;
width: 50px;
height: 150px;
background-color: pink;
}
.goBack {
margin-left: 10px;
font-size: 20px;
display: none;
}
</style>
</head>
<body>
<div class="bar">
<span class="goBack"><a href="#tou">︿  </a><br> 顶部</span>
</div>
<div class="header w" id="tou">头部区域</div>
<div class="banner w">banner 区域</div>
<div class="main w">主体部分</div>
<script>
var bar = document.querySelector(".bar");
var goBack = document.querySelector(".goBack");
document.onscroll = function(){
if(window.pageYOffset >= 108) {
bar.style.position = "fixed";
bar.style.top = "220px";
} else {
bar.style.position = "absolute";
bar.style.top = "45.5%";
}
if(window.pageYOffset >= 320){
goBack.style.display = "block";
} else {
goBack.style.display = "none";
}
}
</script>
</body>
</html>
14. 轮播图

<!DOCTYPE html>
<html lang="Cn_zh">
<head>
<meta charset="UTF-8">
<meta http-equiv="X-UA-Compatible" content="IE=edge">
<meta name="viewport" content="width=device-width, initial-scale=1.0">
<link rel="stylesheet" href="/Case/实例——JS/index.css">
<title>轮播图</title>
<style>
.focus {position: relative;
margin-left: 110px;
margin-top: 50px;
width: 500px;
height: 300px;
border-top: 10px solid rgb(22, 20, 20);
border-bottom: 10px solid rgb(22, 20, 20);
border-right: 10px solid rgb(1, 185, 41);
border-left: 10px solid rgb(1, 185, 41);
background-color: pink;
overflow:hidden;
}
.arrow-l {
position: absolute;
font-size: 30px;
width: 25px;
top: 130px;
padding-bottom: 4px;
color: rgba(255, 255, 255, 0.629);
background-color: rgba(0, 0, 0, 0.34);
border-top-right-radius:100px;
border-bottom-right-radius:100px;
display: none;
z-index: 3;
text-align: center;
}
.arrow-r {
position: absolute;
font-size: 30px;
width: 25px;
top: 130px;
text-align: center;
padding-bottom: 4px;
color: rgba(255, 255, 255, 0.629);
background-color: rgba(0, 0, 0, 0.34);
margin-left: 475px;
border-top-left-radius:100px;
border-bottom-left-radius: 100px;
display: none;
z-index: 3;
}
.focus ul {
position: absolute;
top: 0px;
left: 0px;
width: 600%;
z-index: 1;
}
ul li {
float: left;
display:inline;
width: 500px;
height: 300px;
}
ul img {
width: 500px;
height: 300px;
}
.focus ol {
position: relative;
top: 95%;
width: 200px;
left: 12%;
z-index: 3;
}
ol li {
float: left;
margin-left: 5px;
border-radius: 10px;
border: 1.5px solid #fff;
width: 8px;
height: 8px;
}
.current {
background-color: #fff;
}
</style>
</head>
<body>
<div class="focus">
<a href="javascript:;" class="arrow-l"> < </a>
<a href="javascript:;" class="arrow-r"> > </a>
<ul>
<li>
<a href="#"><img src="/Picture/静态合集/浪涌海水.png" alt=""></a>
</li>
<li>
<a href="#"><img src="/Picture/静态合集/海水浪涛.png" alt=""></a>
</li>
<li>
<a href="#"><img src="/Picture/静态合集/白林.jpg" alt=""></a>
</li>
</ul>
<ol class="circle"></ol>
</div>
<script>
// 简单动画函数封装
function animate(obj, target, callback) {
// 清除以前的定时器,只保留当前定时器
clearInterval(obj.timer);
obj.timer = setInterval(function() {
// console.log(obj.offsetLeft);
// 步长值
var step = (target - obj.offsetLeft) / 10;
// 判断正负,并解决小数点的问题
step = step > 0 ? Math.ceil(step) : Math.floor(step);
// console.log(step);
// 达到目标距离,结束定时器,执行回调函数
if(obj.offsetLeft == target) {
clearInterval(obj.timer);
// if(callback) {
// callback();
// }
callback && callback();
}
// 吧每次加一 这个步长值改为一个缓慢变小的值, 步长公式:(目标值 - 现在的位置) / 10
obj.style.left = obj.offsetLeft + step + 'px';
}, 15);
}
var arrow_l = document.querySelector('.arrow-l');
var arrow_r = document.querySelector('.arrow-r');
// 1. 鼠标经过显示左右按钮,离开隐藏左右按钮
var focus = document.querySelector('.focus');
focus.addEventListener('mouseover', function() {
arrow_l.style.display = 'block';
arrow_r.style.display = 'block';
clearInterval(timer); // 停止自动播放
timer = null; // 清除定时器变量
})
focus.addEventListener('mouseout', function() {
arrow_l.style.display = 'none';
arrow_r.style.display = 'none';
// 鼠标离开开启定时器,自动播放
timer = setInterval(function() {
// 手动调用点击事件
arrow_r.click();
}, 2500);
})
// 获取focus宽度
var focusWidth = focus.clientWidth;
// 2. 动态生成小圆圈,有几张图片,就生成几个小圆圈
var ul = focus.querySelector('ul');
var ol = focus.querySelector('.circle');
for(var i=0; i < ul.children.length; i++) {
// 创建一个小li
var li = document.createElement('li');
// 记录当前小圆圈的索引号, 通过自定义属性来做
li.setAttribute('index', i);
// 吧li插入ol里面
ol.appendChild(li);
// 小圆圈排他思想
li.addEventListener('click', function() {
// 干掉所有人,吧所有小li 清除 current 类名
for(var i=0; i <ol.children.length; i++) {
ol.children[i].className='';
}
// 留下我自己 当前小li 设置类名
this.className = 'current';
// 3. 点击小圆圈,移动图片
// 获取小li 索引号
var index = this.getAttribute('index');
// 当我们点击了某个小圆点,就拿到索引号 给num 和 circle
num = index;
circle = index;
// 移动距离
animate(ul, -index * focusWidth);
})
}
// 第一个小li 设置类名
ol.children[0].className = 'current';
// 4. 克隆第一张图片,放最后
var first = ul.children[0].cloneNode(true);
ul.appendChild(first);
// 5. 点击右侧按钮,图片滚动一张
var num = 0; // 控制图片滚动
var circle = 0; // 控制小圆圈的播放
// flag 节流阀
var flag = true;
// 右侧按钮功能
arrow_r.addEventListener('click', function() {
if(flag) {
flag = false; // 关闭节流阀
// 如果走到了最后一张图片,此时,我们的ul 要快速复原 left 为 0
if(num == ul.children.length-1) {
ul.style.left = 0;
num = 0;
}
num++;
animate(ul, -num * focusWidth, function() {
flag = true; // 打开节流阀
});
// 6. 点击右侧按钮,小圆圈跟着变化
circle++;
// 如果 circle =3 说明到了最后,就复原
if(circle == ol.children.length) {
circle =0;
}
// 调用函数
circleChange();
}
})
// 7. 左侧按钮功能
arrow_l.addEventListener('click', function() {
if(flag) {
flag = false; // 关闭节流阀
// 如果走到了最后一张图片,此时,我们的ul 要快速复原 left 为 0
if(num == 0) {
num = ul.children.length-1;
ul.style.left = -num * focusWidth +'px';
}
num--;
animate(ul, -num * focusWidth, function() {
flag = true; // 打开节流阀
});
// 7. 点击左侧按钮,小圆圈跟着变化
circle--;
// 如果 circle <0 说明第一张图片,则小圆圈要改为最后一个小圆圈
if(circle < 0) {
circle = ol.children.length-1;
}
// 调用函数
circleChange();
}
})
function circleChange() {
// 先清除其余的小圆圈的类名
for(var i = 0; i < ol.children.length; i++) {
ol.children[i].className='';
}
// 留下当前的小圆圈的类名
ol.children[circle].className = 'current';
}
// 8. 自动播放轮播图
var timer = setInterval(function() {
// 手动调用点击事件
arrow_r.click();
}, 2500);
</script>
</body>
</html>
15. 导航栏背景图移动

<!DOCTYPE html>
<html lang="Cn_zh">
<head>
<meta charset="UTF-8">
<meta http-equiv="X-UA-Compatible" content="IE=edge">
<meta name="viewport" content="width=device-width, initial-scale=1.0">
<link rel="stylesheet" href="index.css">
<title>导航栏背景图移动</title>
<style>
body {
background: #000;
}
div {
position: relative;
margin: 20px auto;
width: 67%;
height: 30px;
background: #fff;
border-radius: 5px;
overflow:hidden;
}
div ul {
position: absolute;
top: 3px;
left: 0px;
width: 600%;
z-index: 1;
}
ul li {
float: left;
margin: 5px 10px;
font-weight: bold;
}
.cloud {
width: 70px;
height: 30px;
/* background: pink; */
display: inline-block;
background: url(/Picture/桌面GIF图标/表格头部.jpg);
}
.currents a {
color: rgb(43, 176, 176);
}
.cloud {
position: relative;
left: 0px;
top: 0px;
}
</style>
</head>
<body>
<div id="c-nav" class="c-nav">
<span class="cloud"></span>
<ul>
<li class="currents"><a href="#">首页新闻</a></li>
<li><a href="#">师资力量</a></li>
<li><a href="#">活动策划</a></li>
<li><a href="#">企业文化</a></li>
<li><a href="#">招聘信息</a></li>
<li><a href="#">公司简介</a></li>
<li><a href="#">上海校区</a></li>
<li><a href="#">广州校区</a></li>
</ul>
</div>
<script>
// 简单动画函数封装
function animate(obj, target, callback) {
// 清除以前的定时器,只保留当前定时器
clearInterval(obj.timer);
obj.timer = setInterval(function() {
// console.log(obj.offsetLeft);
// 步长值
var step = (target - obj.offsetLeft) / 10;
// 判断正负,并解决小数点的问题
step = step > 0 ? Math.ceil(step) : Math.floor(step);
// console.log(step);
// 达到目标距离,结束定时器,执行回调函数
if(obj.offsetLeft == target) {
clearInterval(obj.timer);
if(callback) {
callback();
}
}
// 吧每次加一 这个步长值改为一个缓慢变小的值, 步长公式:(目标值 - 现在的位置) / 10
obj.style.left = obj.offsetLeft + step + 'px';
}, 15);
}
</script>
<script>
// 1. 获取元素
var cloud = document.querySelector('.cloud');
var c_nav = document.querySelector('.c_nav');
var li = document.querySelector('ul').children;
// 2. 给所有的小li绑定事件
// 筋斗云起始位置
var current = 0;
for(var i=0; i<li.length; i++) {
// 1) 鼠标经过,吧当前li的位置作为目标值
li[i].addEventListener('mouseenter', function() {
animate(cloud, this.offsetLeft-10);
})
// 2) 鼠标离开就回到起始位置
li[i].addEventListener('mouseleave', function() {
animate(cloud, current-10);
})
// 3)当我们鼠标点击,就把当前位置作为目标值
li[i].addEventListener('click', function() {
current = this.offsetLeft;
for(var j=0; j<li.length; j++) {
li[j].className = '';
}
this.className = 'currents';
})
}
</body>
</html>
16. 记住用户名

<!DOCTYPE html>
<html lang="Cn_zh">
<head>
<meta charset="UTF-8">
<meta http-equiv="X-UA-Compatible" content="IE=edge">
<meta name="viewport" content="width=device-width, initial-scale=1.0">
<title>index</title>
</head>
<body>
<input type="text" name="" id="" class="uname">
<input type="checkbox" class="cbox">记住用户名
<script>
var uname = document.querySelector('.uname');
var cbox = document.querySelector('.cbox');
// 判断用户名是否存在
if(localStorage.getItem('uname')) {
// 给文本框赋值
uname.value = localStorage.getItem('uname');
// 勾选多选框
cbox.checked = true;
}
// 多选框发生改变
cbox.addEventListener('change', function() {
// 若勾选上
if(this.checked) {
// 本地存储用户名
localStorage.setItem('uname', uname.value);
} else {
//本地存储中删除对应的用户名
localStorage.removeItem('uname');
}
})
</script>
</body>
</html>
17. 手风琴效果

<body>
<style>
.kodfun-galeri {
display: flex;
height: 20rem;
gap: 1rem;
}
.kodfun-galeri>div {
flex: 1;
border-radius: 1rem;
background-position: center;
background-repeat: no-repeat;
background-size: auto 100%;
transition: all .8s cubic-bezier(.25, .4, .45, 1.4);
}
.kodfun-galeri>div:hover {
flex: 5;
}
</style>
<div class="kodfun-galeri">
<div style="background: url(./img/1.jpg);"></div>
<div style="background: url(./img/2.jpg);"></div>
<div style="background: url(./img/3.jpg);"></div>
<div style="background: url(./img/4.jpg);"></div>
<div style="background: url(./img/5.jpg);"></div>
</div>
</body>
18. 可视化示例图

<body>

<div id="chart" style="width: 600px;height:400px;"></div>

<div id="chart1" style="width: 600px;height:400px;"></div>

<div id="chart2" style="width: 600px;height:400px;"></div>

<div id="chart3" style="width: 600px;height:400px;"></div>
</body>
<script src="http://cdn.jsdelivr.net/npm/echarts@5.1.2/dist/echarts.min.js"></script>
<script>
// 初始化 ECharts 实例
var myChart = echarts.init(document.getElementById('chart'));
// 配置项和数据
var option = {
title: {
text: '折线图示例'
},
tooltip: {},
legend: {
data: ['销量']
},
xAxis: {
data: ['周一', '周二', '周三', '周四', '周五', '周六', '周日']
},
yAxis: {},
series: [{
name: '销量',
type: 'line',
data: [5, 20, 36, 10, 10, 20, 5]
}]
};
// 使用刚指定的配置项和数据显示图表。
myChart.setOption(option);
</script>
<script>
// 初始化 ECharts 实例
var myChart = echarts.init(document.getElementById('chart1'));
// 配置项和数据
var option = {
title: {
text: '柱状图示例'
},
tooltip: {},
legend: {
data: ['销量']
},
xAxis: {
data: ['周一', '周二', '周三', '周四', '周五', '周六', '周日']
},
yAxis: {},
series: [{
name: '销量',
type: 'bar',
data: [5, 20, 36, 10, 10, 20, 5]
}]
};
// 使用刚指定的配置项和数据显示图表。
myChart.setOption(option);
</script>
<script>
// 初始化 ECharts 实例
var myChart = echarts.init(document.getElementById('chart2'));
// 配置项和数据
var option = {
title: {
text: '饼图示例',
left: 'center'
},
tooltip: {},
legend: {
orient: 'vertical',
left: 'left',
data: ['周一','周二','周三','周四','周五','周六','周日']
},
series: [{
name: '访问来源',
type: 'pie',
radius: '50%',
data: [
{value: 335, name: '周一'},
{value: 310, name: '周二'},
{value: 234, name: '周三'},
{value: 135, name: '周四'},
{value: 1548, name: '周五'},
{value: 154, name: '周六'},
{value: 234, name: '周日'}
],
emphasis: {
itemStyle: {
shadowBlur: 10,
shadowOffsetX: 0,
shadowColor: 'rgba(0, 0, 0, 0.5)'
}
}
}]
};
// 使用刚指定的配置项和数据显示图表。
myChart.setOption(option);
</script>
<script>
// 初始化 ECharts 实例
var myChart = echarts.init(document.getElementById('chart3'));
// 配置项和数据
var option = {
title: {
text: '散点图示例'
},
xAxis: {},
yAxis: {},
series: [{
symbolSize: 20,
data: [
[10.0, 8.04],
[8.0, 6.95],
[13.0, 7.58],
[9.0, 8.81],
[11.0, 8.33],
[14.0, 9.96],
[6.0, 7.24],
[4.0, 4.26],
[12.0, 10.84],
[7.0, 4.82],
[5.0, 5.68]
],
type: 'scatter'
}]
};
// 使用刚指定的配置项和数据显示图表。
myChart.setOption(option);
</script>
