简易后台系统搭建开启,分几篇文章更新,本篇主要先搭架子,配置入口文件等
目录
- 效果图
- 一、搭建脚手架:
- 二、处理package.json基础需要的依赖及运行脚本
- 三、创建环境运行文件
- 四、填充vue.config.ts配置文件
- 五、配置vite-env.d.ts使项目可引入.vue文件,作为组件使用
- 六、配置入口文件App.vue及main.ts
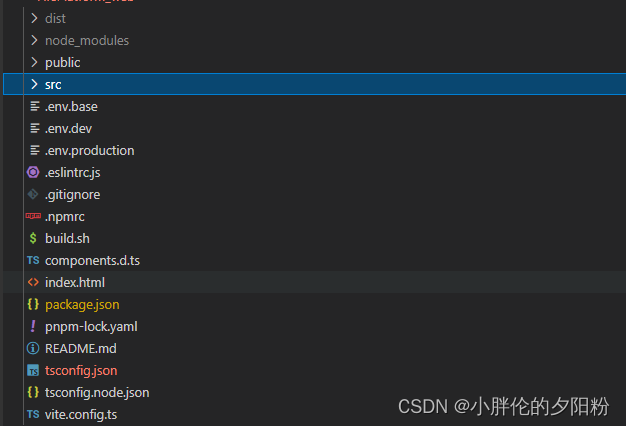
效果图

一个前端的项目要包含:

├── build  项目构建配置
├── public  打包所需静态资源
├── src
    ├── api  AJAX请求
    └── assets  项目静态资源
        ├── iconfont  使用的iconfont里面的自定义图标
        ├── icons  自定义图标资源
        └── images  图片资源
    ├── axios  接口请求
    ├── components  业务组件
    ├── config  项目运行配置
    ├── directive  自定义指令
    ├── mixins  自定义vue mixins
    ├── plugins  自定义vue插件
    ├── router  路由配置
    ├── pinia  Vue3 全局状态管理库
    ├── styles  公共样式
    ├── utils  封装工具函数
    ├── views  页面文件
    ├── App.vue  页面入口文件,主组件。一般只放<router-view>
    ├── main.ts  初始化vue实例,引入所需的插件
├── package.json  依赖配置,脚本配置,程序入口配置等
└── vite.config.ts  vue配置文件
呐—-一步一步走,首先我们要有个架子,然后慢慢往里面填充
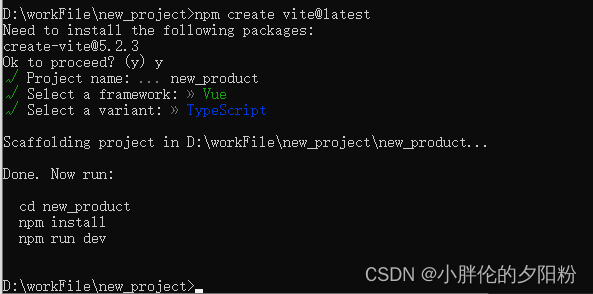
一、搭建脚手架:
使用Vite创建项目
npm create vite@latest
或者
npm install -g create-vite-app
create-vite-app 【项目名称】


三、创建环境运行文件

# 本地环境
NODE_ENV=development

# 接口前缀
VITE_API_BASE_PATH=http://127.0.0.1:8080/

# 打包路径
VITE_BASE_PATH=/product/

# 是否删除debugger
VITE_DROP_DEBUGGER=true

# 是否删除console.log
VITE_DROP_CONSOLE=true

# 是否sourcemap
VITE_SOURCEMAP=false

# 输出路径
VITE_OUT_DIR=dist

# 标题
VITE_APP_TITLE=product
四、填充vue.config.ts配置文件
import path from "path";
import { loadEnv, defineConfig } from "vite";
import Vue from "@vitejs/plugin-vue";
import Components from "unplugin-vue-components/vite";
import { AntDesignVueResolver } from "unplugin-vue-components/resolvers";
import VueJsx from "@vitejs/plugin-vue-jsx";
const root = process.cwd();
const resolve = (dir) => {
return path.join(__dirname, dir);
};
export default defineConfig(({ command, mode }) => {
let env = {} as any;
const isBuild = command === "build";
if (!isBuild) {
env = loadEnv(process.argv[3] === "--mode" ? process.argv[4] : process.argv[3], root);
} else {
env = loadEnv(mode, root);
}
return {
base: env.VITE_BASE_PATH,
plugins: [
Vue(),
VueJsx(),
// 按需加载组件
Components({
resolvers: [
AntDesignVueResolver({
importStyle: false,
prefix: "",
}),
],
}),
],
resolve: {
alias: [
{
find: "vue-i18n",
replacement: "vue-i18n/dist/vue-i18n.cjs.js",
},
{
find: "@",
replacement: resolve("src"),
},
],
},
build: {
minify: "terser",
outDir: env.VITE_OUT_DIR || "dist",
sourcemap: env.VITE_SOURCEMAP === "true" ? "inline" : false,
terserOptions: {
compress: {
drop_debugger: env.VITE_DROP_DEBUGGER === "true",
drop_console: env.VITE_DROP_CONSOLE === "true",
},
},
},
server: {
port: 4000,
proxy: {
"/service": {
target: "http://127.0.0.1:8080/",
rewrite: (path) => path.replace(/^\/api/, "^/"),
},
},
hmr: {
overlay: false,
},
host: "0.0.0.0",
},
};
});
五、配置vite-env.d.ts使项目可引入.vue文件,作为组件使用
注:此文件和mian.ts同级
/// <reference types="vite/client" />
declare module "*.vue" {
import { DefineComponent } from "vue";
// eslint-disable-next-line @typescript-eslint/no-explicit-any, @typescript-eslint/ban-types
const component: DefineComponent<{}, {}, any>;
export default component;
}
六、配置入口文件App.vue及main.ts
App.vue
<template>
<div id="app">
<router-view />
</div>
</template>
<script>
export default {
name: "App",
};
</script>
<style lang="less">
.size {
width: 100%;
height: 100%;
}
html,
body {
.size;
overflow: hidden;
margin: 0;
padding: 0;
}
#app {
.size;
}
</style>
main.ts
import { createApp } from "vue";
import App from "./App.vue";
import router from "@/router/index";
import { setupStore } from "@/pinia/index";
import "@/styles/index.css";
import "@/styles/iconfont/iconfont.css";
import "vxe-table/lib/style.css";
import { message } from "ant-design-vue";
import VXETable from "vxe-table";
import "@/plugins/table";
const app = createApp(App);
// 使用路由
app.use(router);
// 引入VXETable表格组件,非强制组件,可直接用antd的表格组件也可
app.use(VXETable);
// 设置全局message 单页面使用inject获取message
app.provide("message", message);
// 设置全局Pinia
setupStore(app);
// 挂载App
app.mount("#app");
此篇Over,未完待续,其他文章更新Ajax通信和路由设置(含动态路由)等。


