文章目录
- 前言
- 一、开发环境搭建
- 二、创建项目
- 三、编写代码
- 1.插件下载
- 2.编写代码
- 四、测试验证
- 总结
前言
前面我们构建了一个查询用户信息的简单springboot后端demo,今天我们先搭建VSCode+vue的开发环境,然后在这个开发环境上构建一个demo,连接后台springboot demo查询用户信息。
一、开发环境搭建
1)首先去nodejs官网下载node-v20.14.0-x64.msi安装,网址如下:
http://nodejs.org/
2)按以下链接设置环境变量。
http://www.jb51.net/javascript/311637gm8.htm
3)VS官网下载VSCodeUserSetup-x64-1.89.1.exe安装
http://code.visualstudio.com/Download
以上过程如有问题自行搜索解决。
二、创建项目
首先打开VS Code,注意一定要以管理员身份运行,否则的话后面运行npm命令的时候会出错。
然后点击左侧导航菜单的“Open Folder”选择一个文件夹保存项目。

右键点击”demo”文件夹,选择”Open in Integrated Terminal”菜单打开内置命令行。
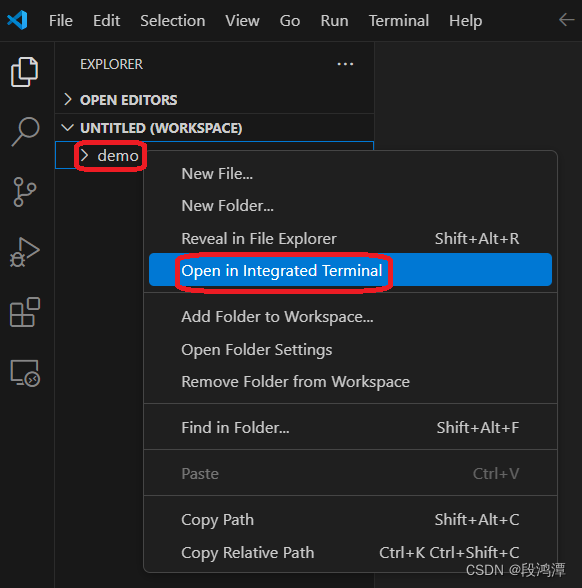
在VS Code下边会出现一个命令行输入窗口,输入vue create vue-demo命令创建vue-demo项目,选择Vue 3回车。

创建成功后会出现以下提示,意思是输入命令运行项目,如下图:
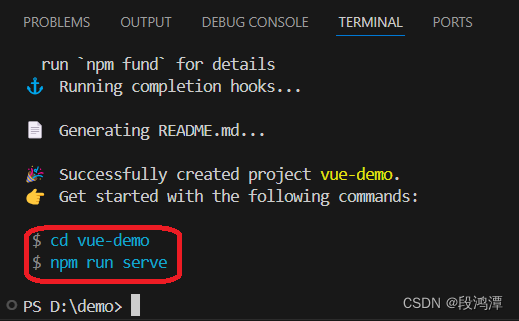
我们先运行试一下,运行成功会出现下图提示,在浏览器中打开网址即可。在命令行按“ctrl+c”可以停止运行。
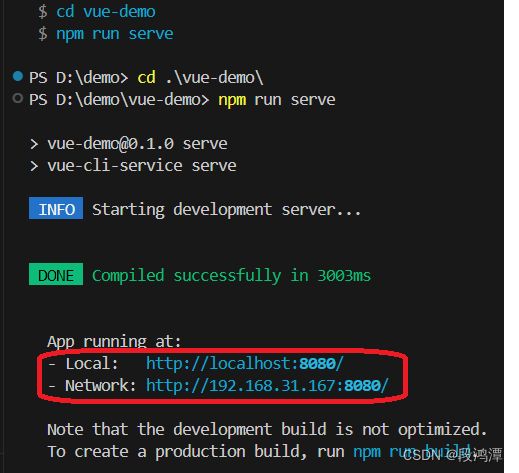
三、编写代码
1.插件下载
项目创建好后有一些插件需要下载,当然也可以在写完代码后运行报错后再去下载,这些插件的作用我们先不说,在后续的代码中大家应该就能知道。依次运行以下命令下载插件。
npm install axios --save
npm install element-plus --save
npm install vue-router --save
npm install sass-loader sass --save
npm install @vueup/vue-quill --save
npm install pinia-persistedstate-plugin --save
npm install pinia --save
下载成功如下图
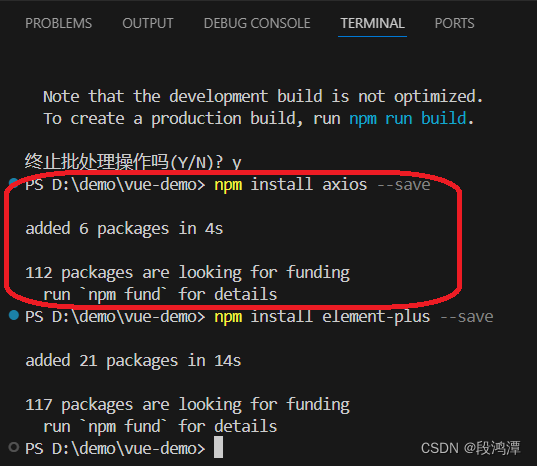
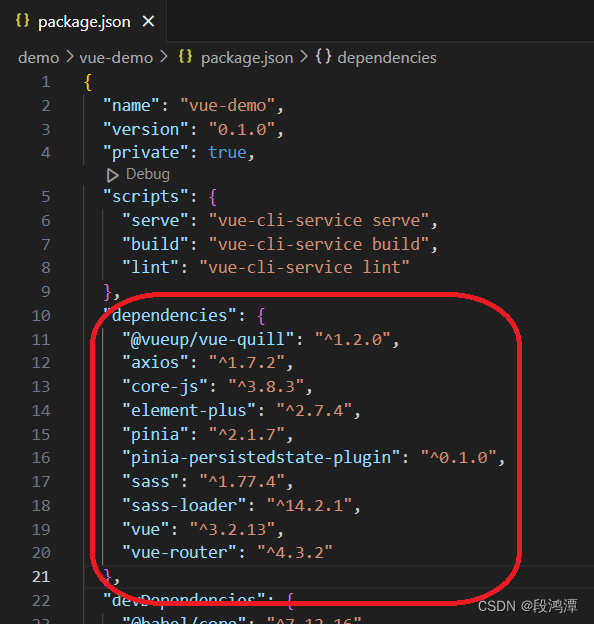
可以对比下载插件前后package.json文件,发现dependencies中会多出这些插件名称。
2.编写代码
1)在src目录下新建目录utils,在utils目录下新建request.js,这个文件主要是导入axios,使用它与后端交互,输入代码:
//导入axios  npm install axios
import axios from 'axios';

//定义一个变量,记录公共的前缀  ,  baseURL
const baseURL = 'http://localhost:8088';
const instance = axios.create({ baseURL })

export default instance;
注意这里的baseURL填写的是后台地址与端口,我这里是在本机运行springboot后台程序,端口是8088,这个可以见第一篇。
2)在src目录下新建目录api,在api目录下新建user.js,这个文件主要实现使用request从后端交互数据业务,输入代码:
import request from '@/utils/request.js'

//用户信息查询
export const userListService = ()=>{
    return request.get('/user/selectAll')
}
这里get里面填写的是后台URL路径,这个可以见第一篇。
3)在src目录下新建目录views,在views目录下新建UserInfo.vue,这个文件主要实现UI界面,输入代码:
<script setup>
import { ref } from 'vue'
//用户信息数据
const users = ref([
])
//查询用户信息
import { userListService } from '@/api/user.js'
const userList = async () => {
let result = await userListService();
users.value = result.data;
}
userList()
//import { QuillEditor } from '@vueup/vue-quill'
import '@vueup/vue-quill/dist/vue-quill.snow.css'
//import { Plus } from '@element-plus/icons-vue'
</script>
<template>
<el-card class="page-container">
<template #header>
<div class="header">
<span>用户信息</span>
</div>
</template>
<!-- 用户列表 -->
<el-table :data="users" style="width: 100%">
<el-table-column label="id" width="400" prop="id"></el-table-column>
<el-table-column label="用户名" prop="userName"></el-table-column>
<el-table-column label="密码" prop="password"> </el-table-column>
<el-table-column label="性别" prop="sex"></el-table-column>
<el-table-column label="电话号码" prop="telephone"></el-table-column>
<template #empty>
<el-empty description="没有数据" />
</template>
</el-table>
</el-card>
</template>
<style lang="scss" scoped>
.page-container {
min-height: 100%;
box-sizing: border-box;
.header {
display: flex;
align-items: center;
justify-content: space-between;
}
}
</style>
4)在src目录下新建目录router,在router目录下新建index.js,这个文件主要实现URL path与views中UI界面的映射关系配置,输入代码:
import { createRouter, createWebHistory } from 'vue-router'
//导入组件
import UserInfoVue from '@/views/UserInfo.vue'
//定义路由关系
const routes = [
{ path: '/', component: UserInfoVue }
]
//创建路由器
const router = createRouter({
history: createWebHistory(),
routes: routes
})
//导出路由
export default router
5)修改src目录下main.js文件,输入代码:
import { createApp } from 'vue'
import ElementPlus from 'element-plus'
import 'element-plus/dist/index.css'
import router from '@/router'
import App from './App.vue'
import locale from 'element-plus/dist/locale/zh-cn.js'
const app = createApp(App);
app.use(router)
app.use(ElementPlus,{locale});
app.mount('#app')
6)修改src目录下App.vue文件,输入代码:
<script setup>
</script>
<template>
<router-view></router-view>
</template>
<style scoped>
</style>
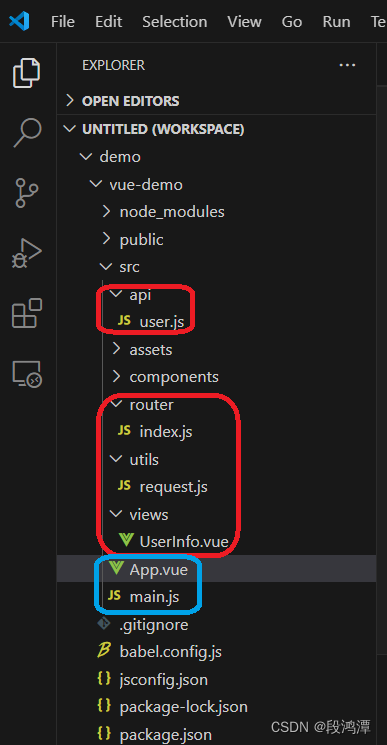
整体目录结构见下图,红色为需要增加的,蓝色为需要修改的。
四、测试验证
输入命令npm run serve运行项目
在浏览器输入“http://localhost:8080”,此时查不到数据。
这是由于跨域问题引起的,可以在springboot的demo项目中修改UserController.java文件,在UserController类实现之前增加@CrossOrigin解决跨域,然后重新运行后台程序。

在浏览器中刷新“http://localhost:8080”,可以查询到后台数据。如下图

此时也可以用IDEAU工具在users数据表中增加记录,然后刷新网页就可以更新数据。
总结
至此,vue+springboot前后台数据就打通了,编程的细节实现我们先放一放,下一步我们先做一个简单登录问题来深入理解一下。


