学了Threejs有一段时间了, 但是都是对着教程学的,没有实际的需求做过,感觉Threejs还是很虚
正好,可能是领导看到了我的焦虑,说到: 小王啊,这里有个机械臂模型的需求,你来处理一下
我:

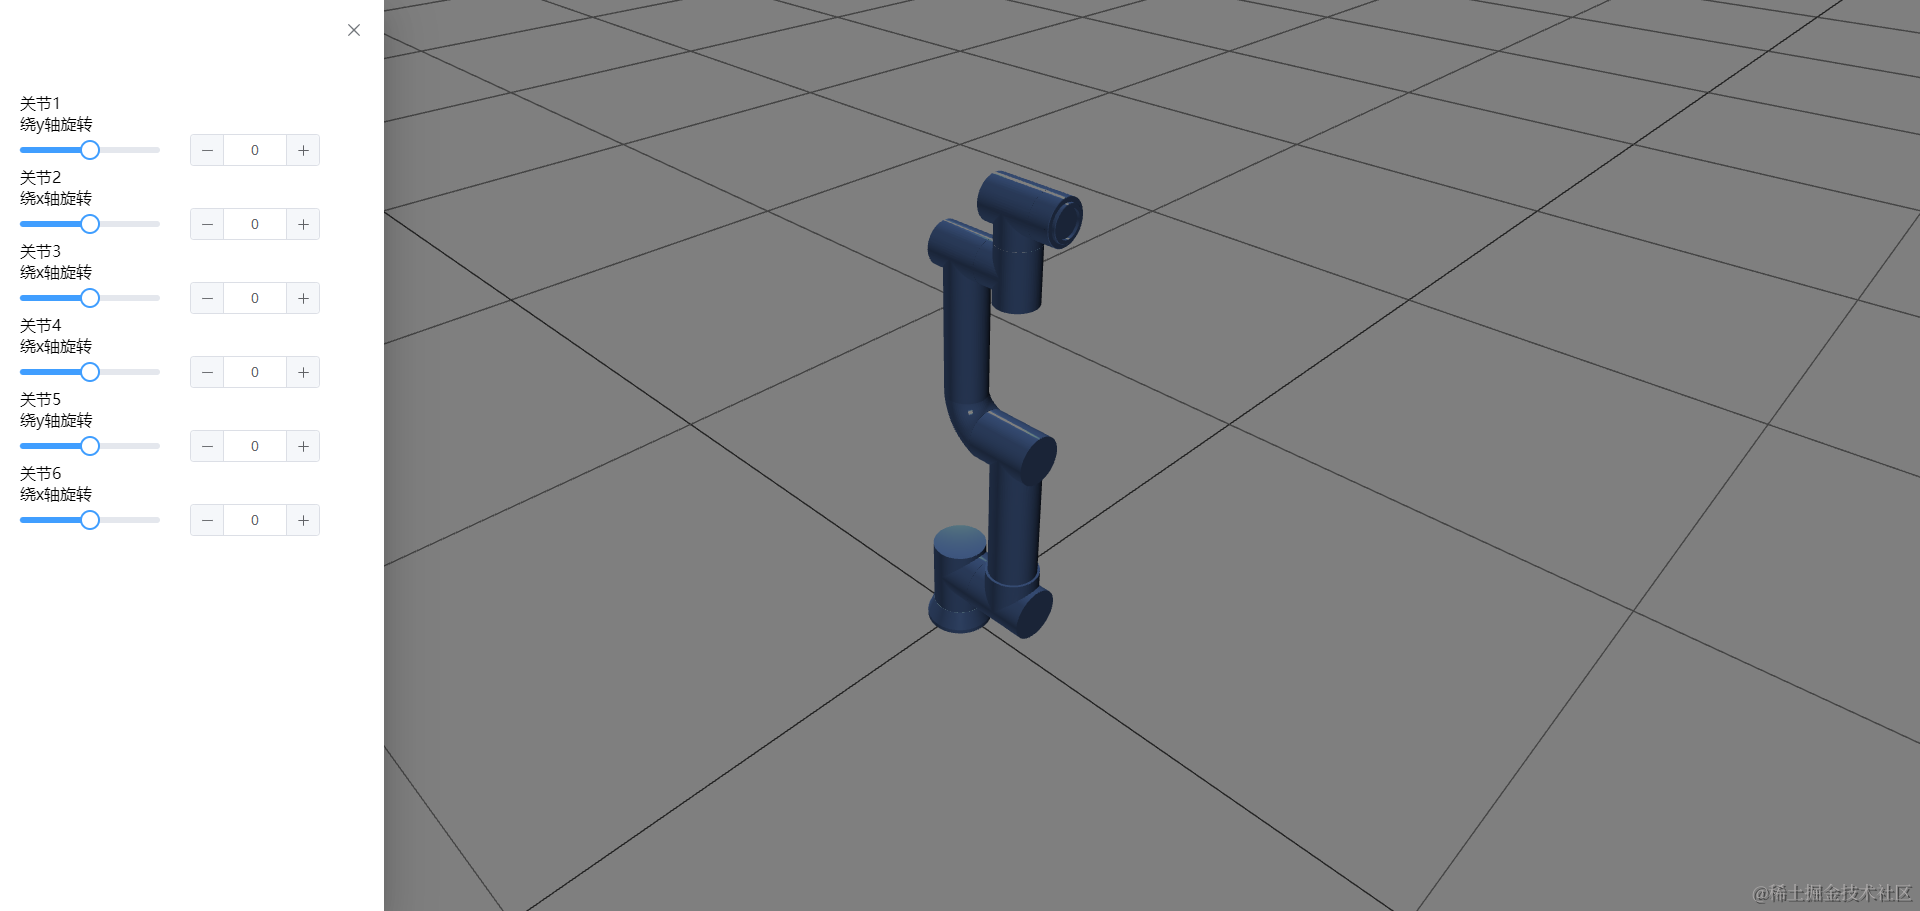
废话不多说,先看效果图


使用技术栈
Vue3 + Vite + Threejs + element-plus
源代码
1. 菜单控制机械臂角度模块
<!--
* @Author: wangzhiyu <w19165802736@163.com>
* @version: 1.0.0
* @Date: 2024-02-20 14:04:30
* @LastEditTime: 2024-02-20 14:09:18
* @Descripttion: 菜单控制机械臂角度模块
-->
<template>
<el-scrollbar height="100%">
<div class="slider-block">
<div class="slider-item">
<p class="demonstration">关节1</p>
<span class="demonstration">绕y轴旋转</span>
<el-slider v-model="joint1" show-input :min="min" :max="max" :step="0.01" @input="sliderInput($event, '1', 'y')" />
</div>
<div class="slider-item">
<p class="demonstration">关节2</p>
<span class="demonstration">绕x轴旋转</span>
<el-slider v-model="joint2" show-input :min="min" :max="max" :step="0.01" @input="sliderInput($event, '2', 'x')" />
</div>
<div class="slider-item">
<p class="demonstration">关节3</p>
<span class="demonstration">绕x轴旋转</span>
<el-slider v-model="joint3" show-input :min="min" :max="max" :step="0.01" @input="sliderInput($event, '3', 'x')" />
</div>
<div class="slider-item">
<p class="demonstration">关节4</p>
<span class="demonstration">绕x轴旋转</span>
<el-slider v-model="joint4" show-input :min="min" :max="max" :step="0.01" @input="sliderInput($event, '4', 'x')" />
</div>
<div class="slider-item">
<p class="demonstration">关节5</p>
<span class="demonstration">绕y轴旋转</span>
<el-slider v-model="joint5" show-input :min="min" :max="max" :step="0.01" @input="sliderInput($event, '5', 'y')" />
</div>
<div class="slider-item">
<p class="demonstration">关节6</p>
<span class="demonstration">绕x轴旋转</span>
<el-slider v-model="joint6" show-input :min="min" :max="max" :step="0.01" @input="sliderInput($event, '6', 'x')" />
</div>
</div>
</el-scrollbar>
</template>
<script setup>
import { ref, defineEmits } from 'vue';
const joint1 = ref(0);
const joint2 = ref(0);
const joint3 = ref(0);
const joint4 = ref(0);
const joint5 = ref(0);
const joint6 = ref(0);
const min = ref(Number(-Math.PI.toFixed(2)));
const max = ref(Number(Math.PI.toFixed(2)));
const emit = defineEmits(['sliderInput']);
const sliderInput = (e, name, direction) => {
emit('sliderInput', e, name, direction);
};
</script>
2. 展示机械臂 + 控制机械臂方法
<!--
* @Author: wangzhiyu <w19165802736@163.com>
* @version: 1.0.0
* @Date: 2024-02-20 15:14:10
* @LastEditTime: 2024-02-20 11:05:28
* @Descripttion: 菜单控制机械臂角度模块
-->
<template>
<div>
<el-drawer v-model="drawer" direction="ltr" size="20%">
<el-aside>
<Menu @sliderInput="sliderInput" />
</el-aside>
</el-drawer>
<div class="btn" v-show="!drawer">
<el-button type="primary" :icon="Operation" circle size="large" @click="drawerSwitch" />
</div>
</div>
</template>
<script setup>
/**
* 旋转中心点
* 2: 0.7,0.67,0
* 3: 0.1,2.42,0
* 4: 0.15,4.113,0
* 5: 0.65,4.38,0
* 6: 0.88,4.68,0
*/
import { Operation } from '@element-plus/icons-vue';
import { ref } from 'vue';
import Menu from './components/Menu/index.vue';
import * as THREE from 'three';
// 控制器
import { OrbitControls } from 'three/addons/controls/OrbitControls.js';
// OBJ模型解析
import { OBJLoader } from 'three/addons/loaders/OBJLoader.js';
import { MTLLoader } from 'three/addons/loaders/MTLLoader.js';
import { onMounted } from 'vue';
// 机械臂零件模型数组
let mtlList = ['0.mtl', '1.mtl', '2.mtl', '3.mtl', '4.mtl', '5.mtl', '6.mtl'];
let objList = ['0.obj', '1.obj', '2.obj', '3.obj', '4.obj', '5.obj', '6.obj'];
// 创建场景->相机->渲染器->相机添加到场景中->渲染器渲染场景和相机->渲染器添加到dom中
let scene = '';
let camera = '';
let renderer = '';
// 轨道控制器
let controls = '';
let handList = [];
let circlePosition = '';
const drawer = ref(false);
const handConfig = [
{
name: '2.mtl',
rotation: {
x: 0.7,
y: 0.63,
z: 0,
},
},
{
name: '3.mtl',
rotation: {
x: 0.1,
y: 2.42,
z: 0,
},
},
{
name: '4.mtl',
rotation: {
x: 0.15,
y: 4.113,
z: 0,
},
},
{
name: '5.mtl',
rotation: {
x: 0.65,
y: 4.38,
z: 0,
},
},
{
name: '6.mtl',
rotation: {
x: 0.88,
y: 4.68,
z: 0,
},
},
];
// 设置各个关节的角度
function sliderInput(value, name, direction) {
// 找到要设置的关节
let target = handList.find(item => item.materialLibraries.join('') === name + '.mtl');
target.rotation[direction] = value;
}
// 开关侧边栏控制栏
const drawerSwitch = () => {
drawer.value = !drawer.value;
};
// 将后面的元素添加到前面元素的children列表中,这样某个节点运动时,节点的children都可以跟随运动
const addChildren = () => {
// 对节点进行排序,避免添加错误的父级
handList = handList.sort((a, b) => a.materialLibraries.join('')[0] - b.materialLibraries.join('')[0]);
// 添加子级模型
for (let i = 0; i < handList.length; i++) {
// 当前模型后面还有其他模型时才会允许添加
if (handList[i + 1]) {
// 当前模型的类型为Group时,表示这里我已经使用了一个父级元素来包住模型了,以此来修改模型运动的中心点,如果没有包住,就表示这个模型的中心点是对的,不需要添加到Group中
handList[i].children[0].type === 'Group' ? handList[i].children[0].add(handList[i + 1]) : handList[i].add(handList[i + 1]);
}
}
console.log(handList[0], 'handList[0]');
// 将最终整合的模型添加到场景中
scene.add(handList[0]);
};
// 初始化
function initBase() {
scene = new THREE.Scene();
scene.position.set(0, -2, 0);
camera = new THREE.PerspectiveCamera(45, window.innerWidth / window.innerHeight, 0.1, 100);
camera.position.set(6, 8, 6);
// 相机添加到场景中
scene.add(camera);
// antialias:开启抗锯齿  logarithmicDepthBuffer:使用对数深度缓冲器,一般在单个场景处理较大的差异
renderer = new THREE.WebGLRenderer({ antialias: true, logarithmicDepthBuffer: true });
renderer.setSize(window.innerWidth, window.innerHeight);
renderer.setClearColor('#fff');
}
// 添加光线
function addLight() {
const positions = [
{ x: 10, y: 10, z: 10 },
{ x: -10, y: 10, z: -10 },
{ x: -30, y: 10, z: 0 },
{ x: 0, y: -10, z: 0 },
];
positions.forEach(pos => {
const light = new THREE.DirectionalLight('#8fbad3', 1);
light.position.set(pos.x, pos.y, pos.z);
scene.add(light);
});
}
// 循环导入模型
for (let i = 0; i < mtlList.length; i++) {
initIsland(mtlList[i], objList[i]);
}
// 添加机械臂模型
function initIsland(mtl, obj) {
// obj解析器
var objLoader = new OBJLoader();
// mtl解析器
var mtlLoader = new MTLLoader();
mtlLoader.load(`./model/${mtl}`, function (materials) {
// 将 MaterialCreator 对象应用到材质文件中
materials.preload();
// 将解析得到的材质赋值给 objLoader 对象
objLoader.setMaterials(materials);
// 加载 OBJ 模型文件
objLoader.load(`./model/${obj}`, function (obj) {
// 如果当前模型需要设置父级,父级将会保存到这个变量中,默认位空
let objNew = null;
// 获取模型的名称
let objName = obj.materialLibraries.join('');
// 获取当前模型对应handConfig对象中的某个配置对象,如果对应的话,就表示需要单独做一些处理
let objInfo = handConfig.find(item => objName === item.name);
// 判断是否对应
if (objInfo) {
// 创建一个Mesh
objNew = new THREE.Mesh(new THREE.SphereGeometry(0, 32, 16), new THREE.MeshBasicMaterial({ color: 'rgba(0,0,0,1)' }));
// 设置Mesh的位置
objNew.position.set(objInfo.rotation.x, objInfo.rotation.y, objInfo.rotation.z);
// 上面设置Mesh的位置会物体的位置也移动过去,这里将物体的位置移动回来
obj.position.set(-objInfo.rotation.x, -objInfo.rotation.y, -objInfo.rotation.z);
// 给Mesh设置名称,便于后续的查找与操作
objNew.materialLibraries = [objInfo.name];
// 将模型添加到Mesh中,这样模型的中心点就会以Mesh的坐标为中心了
objNew.add(obj);
// 调用回调函数,便于操作
objInfo.callback(objNew || obj);
}
// 零件模型添加到数组中,便于后续的修改调试
handList = [...handList, objNew || obj];
// 加载完所有的模型后调用添加父级子级函数
if (handList.length === objList.length) {
// 调用函数,设置父级子级
addChildren();
}
});
});
}
// 轨道控制器
function initOrbitControls() {
controls = new OrbitControls(camera, renderer.domElement);
// 开启阻尼 更加真实
controls.enableDamping = true;
}
// render渲染器
function render() {
// 渲染器更新
renderer.render(scene, camera);
// 控制器更新
controls.update();
requestAnimationFrame(render);
}
// 辅助线
function addHelpLine() {
// const arrowHelper = new THREE.AxesHelper(5);
// scene.add(arrowHelper);
const gridHelper = new THREE.GridHelper(100, 20);
scene.add(gridHelper);
}
// 初始化
initBase();
// 添加灯光
addLight();
// 添加控制器
initOrbitControls();
// 添加辅助线和网格地板
addHelpLine();
onMounted(() => {
// 将渲染器添加到页面中
document.body.appendChild(renderer.domElement);
render();
// 窗口大小处理
window.addEventListener('resize', () => {
// 更新相机宽高比
camera.aspect = window.innerWidth / window.innerHeight;
// 更新相机的投影矩阵
camera.updateProjectionMatrix();
// 更新渲染器渲染的尺寸大小
renderer.setSize(window.innerWidth, window.innerHeight);
// 设置渲染器的像素比(window.devicePixelRatio:当前设备的像素比)
renderer.setPixelRatio(window.innerWidth / window.innerHeight);
});
});
</script>
<style>
.btn {
position: fixed;
bottom: 5%;
left: 50%;
transform: translateX(-50%);
}
</style>
代码解析
1. 搭建项目,初始化依赖
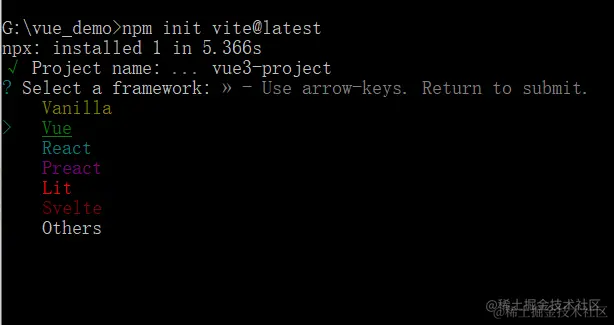
1. 创建Vue3项目
yarn create vite
npm init vite@latest
pnpm create vite

2. 输入项目名称

3. 点击键盘上下方向键到Vue,再按回车选择vue

4. 继续按照如上方式选择JavaScript

5. 打开项目,初始化依赖包
此时项目已经创建完毕,可以通过cd命令进入项目根目录后进行依赖下载
npm install
// 或
yarn
6. 下载初始依赖与 Threejs和Element-Plus依赖
// 下载初始依赖
yarn
// 或
npm install
// 下载Threejs和Element-Plus依赖
yarn add three element-plus
// 或
npm i three element-plus
2. Threejs 场景搭建
1. 导出Threejs与声明基础变量
import * as THREE from 'three';
// 创建场景->相机->渲染器->相机添加到场景中->渲染器渲染场景和相机->渲染器添加到dom中
// 场景变量
let scene = '';
// 相机变量
let camera = '';
// 渲染器变量
let renderer = '';
// 轨道控制器
let controls = ''
2. 初始化Threejs场景
// 初始化
function initBase() {
// 创建场景
scene = new THREE.Scene();
// 设置场景在的位置
scene.position.set(0, -2, 0);
// 创建视口相机
camera = new THREE.PerspectiveCamera(45, window.innerWidth / window.innerHeight, 0.1, 100);
// 修改相机视图位置
camera.position.set(6, 8, 6);
// 相机添加到场景中
scene.add(camera);
// antialias:开启抗锯齿  logarithmicDepthBuffer:使用对数深度缓冲器,一般在单个场景处理较大的差异
renderer = new THREE.WebGLRenderer({ antialias: true, logarithmicDepthBuffer: true });
// 设置渲染器尺寸
renderer.setSize(window.innerWidth, window.innerHeight);
// 设置渲染器颜色
renderer.setClearColor('#fff');
}
initBase()
3. 场景中添加灯光
// 添加光线
function addLight() {
const positions = [
{ x: 10, y: 10, z: 10 },
{ x: -10, y: 10, z: -10 },
{ x: -30, y: 10, z: 0 },
{ x: 0, y: -10, z: 0 },
];
positions.forEach(pos => {
const light = new THREE.DirectionalLight('#8fbad3', 1);
light.position.set(pos.x, pos.y, pos.z);
scene.add(light);
});
}
addLight()
4. 添加轨道控制器
// 轨道控制器
function initOrbitControls() {
// 创建轨道控制器
controls = new OrbitControls(camera, renderer.domElement);
// 开启阻尼 更加真实
controls.enableDamping = true;
}
initOrbitControls()
5. 添加场景辅助线
// 添加辅助线
function addHelpLine() {
const gridHelper = new THREE.GridHelper(100, 20);
scene.add(gridHelper);
}
addHelpLine()
6. 执行场景渲染与监听尺寸变化而不断适配场景
import { onMounted } from 'vue';
// render渲染器
function render() {
// 渲染器更新
renderer.render(scene, camera);
// 控制器更新
controls.update();
requestAnimationFrame(render);
}
onMounted(() => {
// 将渲染器添加到页面中
document.body.appendChild(renderer.domElement);
render();
// 窗口大小处理
window.addEventListener('resize', () => {
// 更新相机宽高比
camera.aspect = window.innerWidth / window.innerHeight;
// 更新相机的投影矩阵
camera.updateProjectionMatrix();
// 更新渲染器渲染的尺寸大小
renderer.setSize(window.innerWidth, window.innerHeight);
// 设置渲染器的像素比(window.devicePixelRatio:当前设备的像素比)
renderer.setPixelRatio(window.innerWidth / window.innerHeight);
});
});
3. 导入模型
1. 导入Threejs导入模型与材质的API
// OBJ模型解析
import { OBJLoader } from 'three/addons/loaders/OBJLoader.js';
// MTL材质解析
import { MTLLoader } from 'three/addons/loaders/MTLLoader.js';
2. 导入模型并添加到场景中
// 机械臂零件模型数组
let mtlList = ['0.mtl', '1.mtl', '2.mtl', '3.mtl', '4.mtl', '5.mtl', '6.mtl'];
// 机械臂零件材质数组
let objList = ['0.obj', '1.obj', '2.obj', '3.obj', '4.obj', '5.obj', '6.obj'];
// 机械臂配置数组(配置中的rotation就是旋转的中心点,技术水平有限,只能通过这种方式指定中心点,有没有大佬可以可以出一些更好的中心点解决方案 ps: 详细问题放在最后了)
const handConfig = [
{
name: '2.mtl',
rotation: {
x: 0.7,
y: 0.63,
z: 0,
},
},
{
name: '3.mtl',
rotation: {
x: 0.1,
y: 2.42,
z: 0,
},
},
{
name: '4.mtl',
rotation: {
x: 0.15,
y: 4.113,
z: 0,
},
},
{
name: '5.mtl',
rotation: {
x: 0.65,
y: 4.38,
z: 0,
},
},
{
name: '6.mtl',
rotation: {
x: 0.88,
y: 4.68,
z: 0,
},
},
];
// 添加机械臂模型
function initIsland(mtl, obj) {
// obj解析器
var objLoader = new OBJLoader();
// mtl解析器
var mtlLoader = new MTLLoader();
mtlLoader.load(`./model/${mtl}`, function (materials) {
// 将 MaterialCreator 对象应用到材质文件中
materials.preload();
// 将解析得到的材质赋值给 objLoader 对象
objLoader.setMaterials(materials);
// 加载 OBJ 模型文件
objLoader.load(`./model/${obj}`, function (obj) {
// 如果当前模型需要设置父级,父级将会保存到这个变量中,默认位空
let objNew = null;
// 获取模型的名称
let objName = obj.materialLibraries.join('');
// 获取当前模型对应handConfig对象中的某个配置对象,如果对应的话,就表示需要单独做一些处理
let objInfo = handConfig.find(item => objName === item.name);
// 判断是否对应
if (objInfo) {
// 创建一个Mesh
objNew = new THREE.Mesh(new THREE.SphereGeometry(0, 32, 16), new THREE.MeshBasicMaterial({ color: 'rgba(0,0,0,1)' }));
// 设置Mesh的位置
objNew.position.set(objInfo.rotation.x, objInfo.rotation.y, objInfo.rotation.z);
// 上面设置Mesh的位置会物体的位置也移动过去,这里将物体的位置移动回来
obj.position.set(-objInfo.rotation.x, -objInfo.rotation.y, -objInfo.rotation.z);
// 给Mesh设置名称,便于后续的查找与操作
objNew.materialLibraries = [objInfo.name];
// 将模型添加到Mesh中,这样模型的中心点就会以Mesh的坐标为中心了
objNew.add(obj);
// 调用回调函数,便于操作
objInfo.callback(objNew || obj);
}
// 零件模型添加到数组中,便于后续的修改调试
handList = [...handList, objNew || obj];
// 加载完所有的模型后调用添加父级子级函数
if (handList.length === objList.length) {
// 调用函数,设置父级子级
addChildren();
}
});
});
}
// 循环导入模型
for (let i = 0; i < mtlList.length; i++) {
initIsland(mtlList[i], objList[i]);
}
3. 将模型一层层嵌套添加到上一个模型关节的children中,方便控制
为什么要这样处理: 这样处理之后,基座的旋转角度改变,则基座的children子模型都会跟随改变,也就解决了后续关节模型不会跟随之前的关节模型所改变的问题
// 将后面的元素添加到前面元素的children列表中,这样某个节点运动时,节点的children都可以跟随运动
const addChildren = () => {
// 对节点进行排序,避免添加错误的父级
handList = handList.sort((a, b) => a.materialLibraries.join('')[0] - b.materialLibraries.join('')[0]);
// 添加子级模型
for (let i = 0; i < handList.length; i++) {
// 当前模型后面还有其他模型时才会允许添加
if (handList[i + 1]) {
// 当前模型的类型为Group时,表示这里我已经使用了一个父级元素来包住模型了,以此来修改模型运动的中心点,如果没有包住,就表示这个模型的中心点是对的,不需要添加到Group中
handList[i].children[0].type === 'Group' ? handList[i].children[0].add(handList[i + 1]) : handList[i].add(handList[i + 1]);
}
}
console.log(handList[0], 'handList[0]');
// 将最终整合的模型添加到场景中
scene.add(handList[0]);
};
4. 提供控制机械臂运动到指定角度的API
/**
* 设置各个关节的角度
* @param {number} value 指定的角度值
* @param {string} name 控制的关节名称
* @param {string} direction 旋转方向
*/
function sliderInput(value, name, direction) {
// 找到要设置的关节
let target = handList.find(item => item.materialLibraries.join('') === name + '.mtl');
target.rotation[direction] = value;
}
5. 主页面布局部分
<template>
<div>
<el-drawer v-model="drawer" direction="ltr" size="20%">
<el-aside>
<Menu @sliderInput="sliderInput" />
</el-aside>
</el-drawer>
<div class="btn" v-show="!drawer">
<el-button type="primary" :icon="Operation" circle size="large" @click="drawerSwitch" />
</div>
</div>
</template>
6. 子页面Menu部分
<template>
<el-scrollbar height="100%">
<div class="slider-block">
<div class="slider-item">
<p class="demonstration">关节1</p>
<span class="demonstration">绕y轴旋转</span>
<el-slider v-model="joint1" show-input :min="min" :max="max" :step="0.01" @input="sliderInput($event, '1', 'y')" />
</div>
<div class="slider-item">
<p class="demonstration">关节2</p>
<span class="demonstration">绕x轴旋转</span>
<el-slider v-model="joint2" show-input :min="min" :max="max" :step="0.01" @input="sliderInput($event, '2', 'x')" />
</div>
<div class="slider-item">
<p class="demonstration">关节3</p>
<span class="demonstration">绕x轴旋转</span>
<el-slider v-model="joint3" show-input :min="min" :max="max" :step="0.01" @input="sliderInput($event, '3', 'x')" />
</div>
<div class="slider-item">
<p class="demonstration">关节4</p>
<span class="demonstration">绕x轴旋转</span>
<el-slider v-model="joint4" show-input :min="min" :max="max" :step="0.01" @input="sliderInput($event, '4', 'x')" />
</div>
<div class="slider-item">
<p class="demonstration">关节5</p>
<span class="demonstration">绕y轴旋转</span>
<el-slider v-model="joint5" show-input :min="min" :max="max" :step="0.01" @input="sliderInput($event, '5', 'y')" />
</div>
<div class="slider-item">
<p class="demonstration">关节6</p>
<span class="demonstration">绕x轴旋转</span>
<el-slider v-model="joint6" show-input :min="min" :max="max" :step="0.01" @input="sliderInput($event, '6', 'x')" />
</div>
</div>
</el-scrollbar>
</template>
<script setup>
import { ref, defineEmits } from 'vue';
const joint1 = ref(0);
const joint2 = ref(0);
const joint3 = ref(0);
const joint4 = ref(0);
const joint5 = ref(0);
const joint6 = ref(0);
const min = ref(Number(-Math.PI.toFixed(2)));
const max = ref(Number(Math.PI.toFixed(2)));
const emit = defineEmits(['sliderInput']);
const sliderInput = (e, name, direction) => {
emit('sliderInput', e, name, direction);
};
</script>
PS: 问题–> 关于Threejs如何指定旋转中心点为上一个机械臂关节的指定点位功能有没有大佬可以提供一下思路或者解决办法,我的办法比较笨,就是在每个关节外面包了一层物体,然后控制物体的位置到上一个机械臂关节的指定点,也就是配置数组中的rotation中的xyz参数,但是这里的xyz都是手动一点点肉眼看出来差别的,希望有大佬可以优化一下
补充: 此项目的任何问题以及源代码和模型文件可以加wx获取: wang3209605851 , 或者csdn私信也可以😁
总结: 综上上上上…所述,一个前端通过控件控制机械臂进行旋转的功能就完成啦! 也是成功的给老大做了一碗牛肉面
老大: 


